In this blog ,we will create a simple blockchain application todo list using Ethereum smart contracts.It will be 3 part series ,we will cover below details.
Part-1 In this part ,we’ll create a smart contract with the Solidity programming language.
Part-2 In this part, we’ll write tests against the smart contract, and deploy it to a blockchain.
Part-3 In this part, we’ll create a client side application to for the todo list.
Prerequisite :
- Install Ganache (https://www.trufflesuite.com/ganache)
- Install nodejs (https://nodejs.org/en/)
- Install truffle (https://www.trufflesuite.com/)- npm install -g truffle or sudo npm install -g truffle
- Install metamask plugin and configure to browser(https://chrome.google.com/webstore/detail/metamask/nkbihfbeogaeaoehlefnkodbefgpgknn?hl=en)
Step-1 -Let’s create the project.I’ll first create a project directory and go into directory.
$ mkdir todo-list
$ cd todo-list
Now we initialize a new truffle project to develop our project like this:
$ truffle init

Step-2 -Create a package.json file to install some development dependencies that will need for the project. You can do that from the command line like this:
$ touch package.json
Install all dependencies for your project by simply copy-and-pasting the code below into your package.json file:
{
“name”: “todo-list”,
“version”: “1.0.0”,
“description”: “Todo List”,
“main”: “truffle-config.js”,
“directories”: {
“test”: “test”
},
“scripts”: {
“dev”: “lite-server”,
“test”: “echo \”Error: no test specified\” && exit 1″
},
“author”: “asifwaquar2012.com”,
“license”: “”,
“devDependencies”: {
“bootstrap”: “^4.4.1”,
“chai”: “^4.1.2”,
“chai-as-promised”: “^7.1.1”,
“chai-bignumber”: “^2.0.2”,
“lite-server”: “^2.3.0”,
“nodemon”: “^1.17.3”,
“truffle”: “5.0.2”,
“truffle-contract”: “3.0.6”
}
}
Step-3 -Now you can install the dependencies from the command line like this:
$ npm install
After installing all dependencies ,below will be project structure.

- contracts directory: this is where all smart contacts live. We already have a Migration contract that handles our migrations to the blockchain.
- migrations directory: this is where all of the migration files live. These migrations are similar to other web development frameworks that require migrations to change the state of a database. Whenever we deploy smart contracts to the blockchain, we are updating the blockchain’s state, and therefore need a migration.
- node_modules directory: this is the home of all of our Node dependencies we just installed.
- test directory: this is where we’ll write our tests for our smart contract.
- truffle-config.js file: this is the main configuration file for our Truffle project, where we’ll handle things like network configuration.
Step-4 -Now let’s start developing the smart contract that will manage our todo list. We can do this by creating a new file in the contracts directory like this:
$ touch ./contracts/TodoList.sol
We’ll write code to just keep track of the number of tasks inside the todo list. Here taskCount is a special kind of variable called a “state variable”. Any data that we store inside this state variable is written to storage on the blockchain. It changes the smart contract’s state, and has scope within the entire smart contract, as opposed to local variables which only have scope inside of functions. We can set a default value of 0 for this state variable like this:

Step-5 -Now let’s compile the smart contract and ensure that there are no errors:
$ truffle compile
We have written our first Ethereum smart contract. You should notice that a new file was generated whenever you compiled the smart contract at the following path: `./build/contracts/TodoList.json`. This file is the smart contract ABI file, which stands for “Abstract Binary Interface”. This file has many responsibilities, but two that I will highlight here: It contains the compiled bytecode version of the Solidity smart contract code that can be run on a the Ethereum Virtual Machine (EVM), i.e., an Ethereum Node. It contains a JSON representation of the smart contract functions that can be exposed to external clients, like client-side JavaScript applications.
To talk to the smart contract on the personal blockchain network inside the Truffle console, we must do a few things:
- Update our project’s configuration file to specify the personal blockchain network we want to connect to (Ganache).
- Create a migration script that tells Truffle how to deploy the smart contract to the personal blockchain network.
- Run the newly created migration script, deploying the smart contract to the personal blockchain network.
Step-6 First, we’ll update the project configuration file to specify the personal blockchain network we want set up in the first section. Find the file truffle-config.js and update the following code:

Note: these should match the default settings provided by the Ganache personal blockchain network. If you changed any settings inside the Ganache settings page, like the port, those should be reflected here.
Step-7 Next, we’ll create a migration script inside the migrations directory to deploy the smart contract to the personal blockchain network. From your project root, create a new file from the command line like this:
$ touch migrations/2_deploy_contracts.js
Any time we create a new smart contract, we are updating the state of the blockchain. As earlier i mentioned ,blockchain fundamentally is a database. Hence, whenever we permanently change it, we must migrate it from one state to another. This is very similar to a database migration that you might have performed in other web application development frameworks.
Notice that we number all of our files inside the migrations directory with numbers so that Truffle knows which order to execute them in. Inside this newly created migration file, you can use this code to deploy the smart contract:
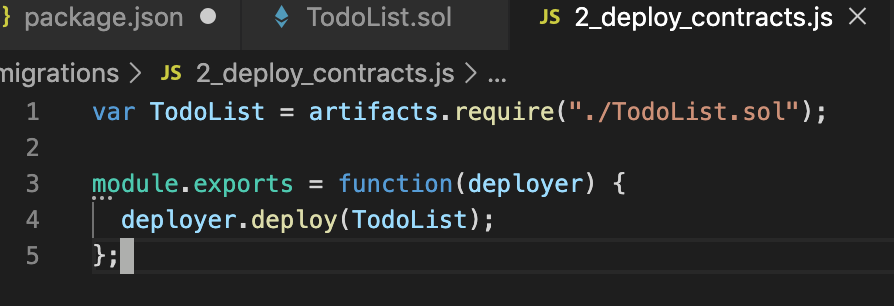
Step-8 First, we require the contract we’ve created, and assign it to a variable called “TodoList”. Next, we add it to the manifest of deployed contracts to ensure that it gets deployed when we run the migrations. Now let’s run this migration script from the command line like this:
$ truffle migrate
Step-9 Now that we have successfully migrated the smart contract to the personal blockchain network, let’s open the console to interact with the smart contract. You can open the truffle console from the command line like this:
$ truffle console
Step-10 Now that we’re inside the console, let’s get an instance of our deployed smart contract and see if we can read the taskCount from the contract. From the console, run this code:
todoList = await TodoList.deployed()
Here TodoList is the name of the variable that we created in the migration file. We retrieved a deployed instance of the contract with the deployed() function, and assigned it to an todoList. Also, note the use of the await keyword. We must interact with the blockchain in an asynchronous fashion.

Step-11 First, we can get the address of the smart contract that was deployed to the blockchain like this and then we can read the value of taskCount from the storage :

We have done all of the following:
- Set up your machine for blockchain development
- Created a new truffle project
- Created your first smart contract
- Interacted with your newly created smart contract on a live blockchain.