In this Blog ,We are going to discuss how we can Build Consortium using Azure Kubernetes Service (AKS) template . In part-1 we have seen how we will setup Hyperledger Fabric Blockchain network and deployed the orderer/peer organization.
To build the blockchain consortium post deploying the ordering service and peer nodes, you need to carry out the below steps in sequence. Azure HLF script (azhlf), which helps you with setting up the consortium, creating channel, and chaincode operations.
Step-1 Launch Azure Cloud Shell. It will ask to choose cloud storage account to launch cloud shell . If already existing cloud storage account available you may choose or you may choose to create new cloud storage account to launch cloud shell.

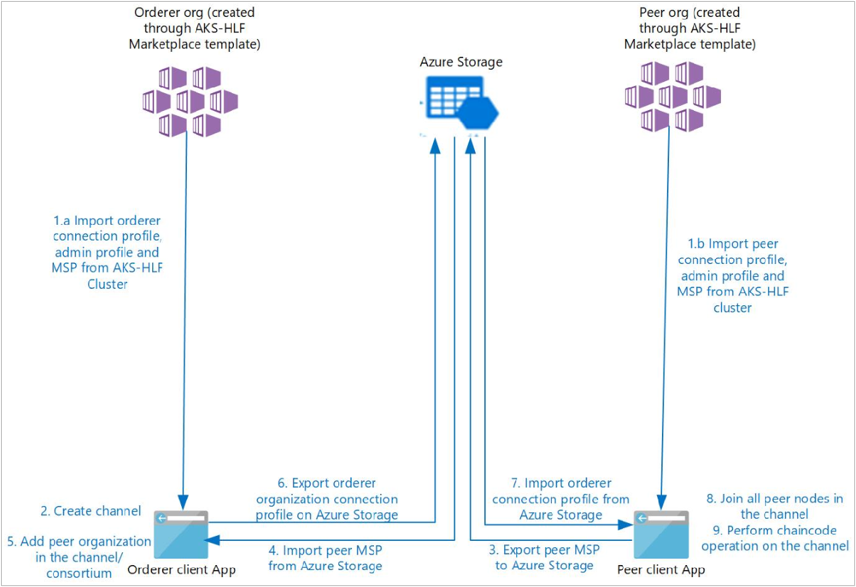
You may choose option to choose bash shell also .Below diagram show step by step process to build consortium (reference image from azure docs .)

For the initial setup of the client application:
- Download client application files
- Setup environment variables
- Import organization connection profile, admin user, and MSP
Step-2 Download client application files, Execute below commands.
curl https://raw.githubusercontent.com/Azure/Hyperledger-Fabric-on-Azure-Kubernetes-Service/master/azhlfToolSetup.sh | bashNote – If above script is not able to execute properly or giving error . eg. refer below pic.

Then please execute below commands manually and execute further steps.
# This script clones 'azhlfTool' folder from
git init
git config core.sparsecheckout true
echo "azhlfTool" > .git/info/sparse-checkout
git remote add -f origin https://github.com/Azure/Hyperledger-Fabric-on-Azure-Kubernetes-Service.git
git reset --hard origin/master
git pull origin master
echo
echo "===> Done"
Step-3 -Execute Below Commands
cd azhlfTool
npm install
npm run setup
Step-4 Setup environment variables
Orderer Environment Variable Setup
$ORDERER_ORG_SUBSCRIPTION="Your Subscrption"
$ORDERER_ORG_RESOURCE_GROUP="xxx_hlf_orderer_resource"
$ORDERER_ORG_NAME="xxx_orderermember"
$ORDERER_ADMIN_IDENTITY="admin.$ORDERER_ORG_NAME"
$CHANNEL_NAME="xxxxazurehlfchannel"
Peer Environment Variable Setup
$PEER_ORG_SUBSCRIPTION="Your Subscrption"
$PEER_ORG_RESOURCE_GROUP="xxxx_hlf_orderer_resource"
$PEER_ORG_NAME="xxx_peernode1"
$PEER_ADMIN_IDENTITY="admin.$PEER_ORG_NAME"
Storage Environment Variable Setup (if you want to store files in existing storage you may provide existing storage account details below )
$STORAGE_SUBSCRIPTION="Your Subscrption"
$STORAGE_RESOURCE_GROUP="xxx_storage_resource_group"
$STORAGE_ACCOUNT="xxxx_storageaccount"
$STORAGE_LOCATION="northeurope"
$STORAGE_FILE_SHARE="xxx_fileshare"
Step-5 After setting up storage environment variable to store files , we need create storage account . If you have any existing storage account which you have mentioned while setting up storage environment variable then skip below step otherwise create Storage account with storage account environment variables setup above.
az account set --subscription $STORAGE_SUBSCRIPTION
az group create -l $STORAGE_LOCATION -n $STORAGE_RESOURCE_GROUP
az storage account create -n $STORAGE_ACCOUNT -g  $STORAGE_RESOURCE_GROUP -l $STORAGE_LOCATION --sku Standard_LRS
Step-6 Generate storage key and create file share (If you already have a file share created in existing storage account, you may skip step-5 ,step6 eg. below pic )
STORAGE_KEY=$(az storage account keys list --resource-group $STORAGE_RESOURCE_GROUP  --account-name $STORAGE_ACCOUNT --query "[0].value" | tr -d '"')
az storage share create  --account-name $STORAGE_ACCOUNT  --account-key $STORAGE_KEY  --name $STORAGE_FILE_SHARE
Step-7 – Follow below steps for generating Azure file share connection string
STORAGE_KEY=$(az storage account keys list --resource-group $STORAGE_RESOURCE_GROUP  --account-name $STORAGE_ACCOUNT --query "[0].value" | tr -d '"')
SAS_TOKEN=$(az storage account generate-sas --account-key $STORAGE_KEY --account-name $STORAGE_ACCOUNT --expiry `date -u -d "1 day" '+%Y-%m-%dT%H:%MZ'` --https-only --permissions lruwd --resource-types sco --services f | tr -d '"')
AZURE_FILE_CONNECTION_STRING=https://$STORAGE_ACCOUNT.file.core.windows.net/$STORAGE_FILE_SHARE?$SAS_TOKEN
Step-8 Execute below commands to fetch organization’s connection profile, admin user identity, and MSP from Azure Kubernetes Cluster and store these identities in client application local store i.e. in “azhlfTool/stores” directory.
For orderer organization:
./azhlf adminProfile import fromAzure -o $ORDERER_ORG_NAME -g $ORDERER_ORG_RESOURCE_GROUP -s $ORDERER_ORG_SUBSCRIPTION
./azhlf connectionProfile import fromAzure -g $ORDERER_ORG_RESOURCE_GROUP -s $ORDERER_ORG_SUBSCRIPTION -o $ORDERER_ORG_NAME
./azhlf msp import fromAzure -g $ORDERER_ORG_RESOURCE_GROUP -s $ORDERER_ORG_SUBSCRIPTION -o $ORDERER_ORG_NAME
For peer organization:
./azhlf adminProfile import fromAzure -g $PEER_ORG_RESOURCE_GROUP -s $PEER_ORG_SUBSCRIPTION -o $PEER_ORG_NAME
./azhlf connectionProfile import fromAzure -g $PEER_ORG_RESOURCE_GROUP -s $PEER_ORG_SUBSCRIPTION -o $PEER_ORG_NAME
./azhlf msp import fromAzure -g $PEER_ORG_RESOURCE_GROUP -s $PEER_ORG_SUBSCRIPTION -o $PEER_ORG_NAME
Step-9 Now we need to create channel and set anchor peers (A peer node on a channel that all other peers can discover and communicate with.) Execute below command to create channel.
./azhlf channel create -c $CHANNEL_NAME -u $ORDERER_ADMIN_IDENTITY -o $ORDERER_ORG_NAMESetting anchor peer(s) command
For powershell
./azhlf channel setAnchorPeers -c $CHANNEL_NAME -p peer1 -o $PEER_ORG_NAME -u $PEER_ADMIN_IDENTITY
For bash
./azhlf channel setAnchorPeers -c $CHANNEL_NAME -p "peer1" -o $PEER_ORG_NAME -u $PEER_ADMIN_IDENTITY
Step-10 Execute below commands in the given order to add a peer organization in a channel and consortium
1-From peer organization client, upload peer organization MSP on Azure Storage
./azhlf msp export toAzureStorage -f $AZURE_FILE_CONNECTION_STRING -o $PEER_ORG_NAME
2- From orderer organization client, download peer organization MSP from Azure Storage and then issue command to add peer organization in channel/consortium.
./azhlf msp import fromAzureStorage -o $PEER_ORG_NAME -f $AZURE_FILE_CONNECTION_STRING
./azhlf channel join -c  $CHANNEL_NAME -o $ORDERER_ORG_NAME  -u $ORDERER_ADMIN_IDENTITY -p $PEER_ORG_NAME
./azhlf consortium join -o $ORDERER_ORG_NAME  -u $ORDERER_ADMIN_IDENTITY -p $PEER_ORG_NAME
3-From orderer organization client, upload orderer connection profile on Azure Storage so that peer organization can connect to orderer nodes using this connection profile
./azhlf connectionProfile export toAzureStorage -o $ORDERER_ORG_NAME -f $AZURE_FILE_CONNECTION_STRING
4-From peer organization client, download orderer connection profile from Azure Storage and then issue command to add peer nodes in the channel.

All above script execution e.g (for reference to execute all above scripts)
Import organization connection profile, admin user identity, and MSP

Create channel,join channel,set anchor peer


Step-11 Chaincode management commands
Set the below chaincode specific environment variables
ORGNAME=<PeerOrgName>
USER_IDENTITY="admin.$ORGNAME"
CC_NAME=“chaincode_example02”
CC_VERSION="1"
CC_PATH=“/home/mohammad(change your username )/azhlfTool/chaincode/src/chaincode_example02/go”
CHANNEL_NAME=<channelName> 
Step-12 – Execute below command to install chaincode on the peer organization.
./azhlf chaincode install -o $ORGNAME -u $USER_IDENTITY -n $CC_NAME -p $CC_PATH -l $CC_LANG -v $CC_VERSION
