In this article , I will show you how you can migrate your on premise sql server database to Azure Sql Database. There are a couple of ways to do it but in this article we will show with the help of Microsoft Data migration Assistant for SQL Server which you can download from here .
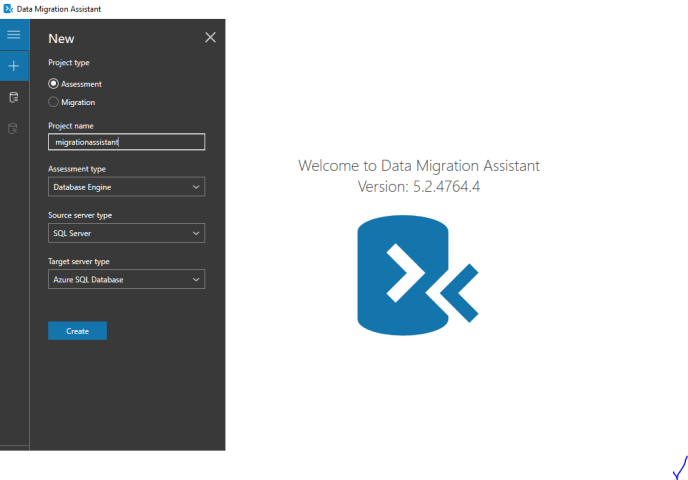
Step-1 Create an assessment project using a data migration assistant. Provide details such as Project name , Assessment Type ,Source Server Type, Target Server Type.

Step-2 – Select option for database compatibility and feature parity options.

Step-3 -Enter DB credentials to connect the source database . Choose Authentication Type SQL Server Authentication and database.


Step-4 – Click on start assessment button.

Step-5 – There are two options: one to check unsupported features and recommendation to fix it and other compatibility issues .

Choose another option to check if any compatibility issues .

Step-6– If there is no compatibility or unsupported feature . Create a Migration project using source database server and destination database server and migration scope option .

Step-7– Now choose source database connection settings (Windows Authentication Type is not supported to migrate data from SQL server to Azure SQL Database).

Step-8 – Now choose database you want to migrate .

Step-9 – Provide destination database Server Name, Authentication Type and Sql Authentication Credentials.

Step-10– Choose the objects which you want to migrate and click on generate sql script.

Step-11– SQL script will be generated . Now choose option to deploy schema. You can also save schema .

Step-12– If any schema failed you can fix errors and redeploy schema or you can choose migrate data option.

Step-13 – If you choose migrate data option .You need to choose tables to migrate and click on start data migration option .

Step-14– After successful migration of data you can see report .

Step-15– You can connect to Azure SQL Database and query data to verify results.

